> ## Documentation Index
> Fetch the complete documentation index at: https://support.lumafield.com/llms.txt
> Use this file to discover all available pages before exploring further.
# Neptune Machine Initialization
> Turn on and start-up your scanner
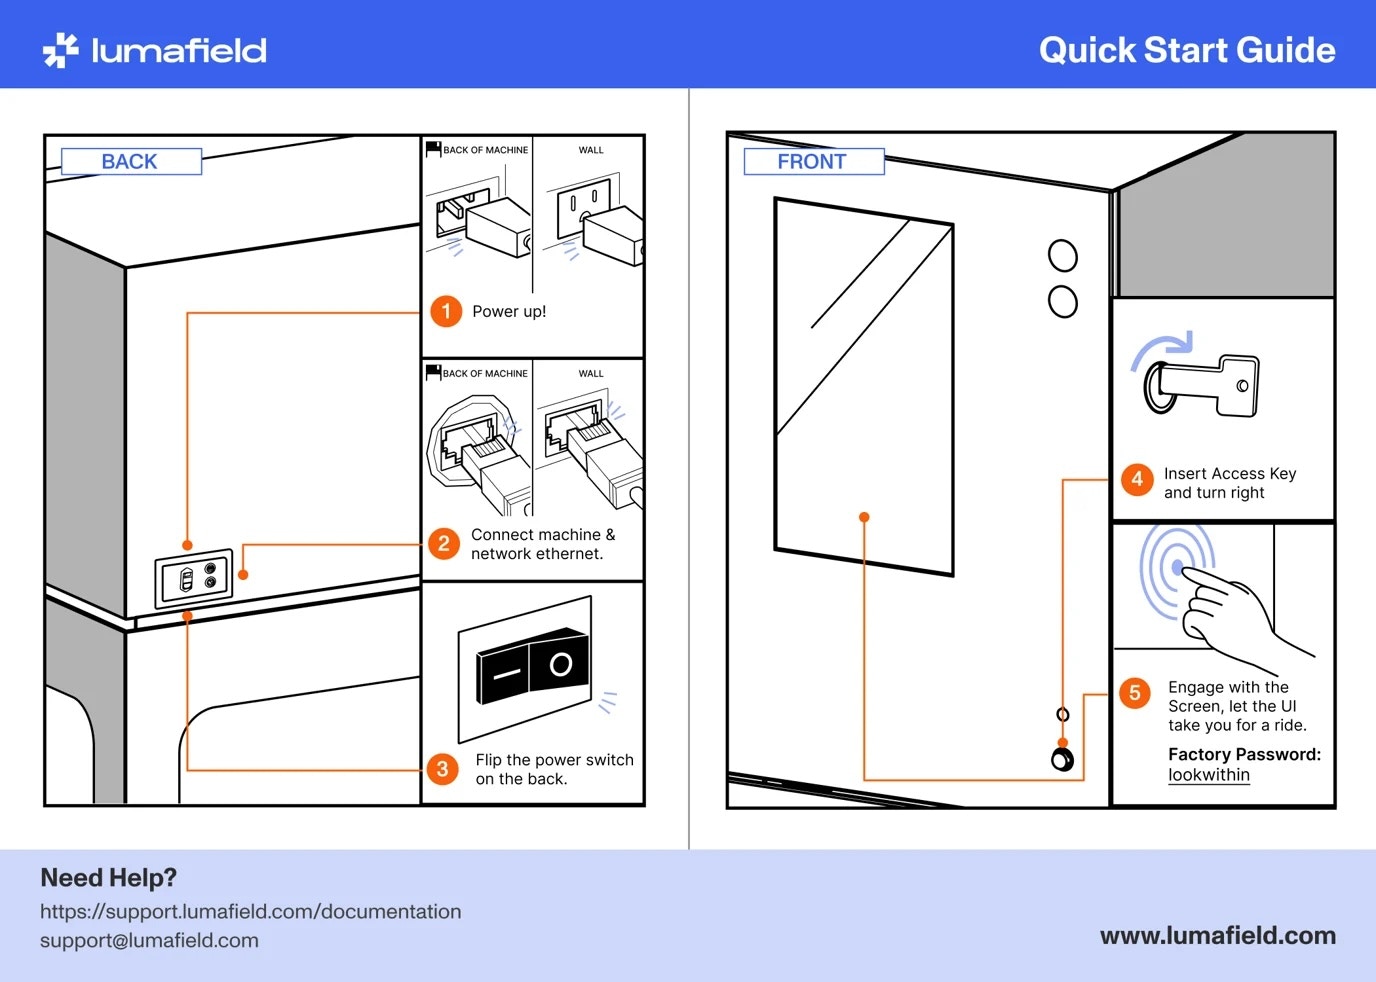
Quick Start Guide
The Lumafield Neptune is designed for seamless integration into any professional workspace, requiring only a standard 120V wall outlet for operation.
 **Note:** Scanners with firmware delivered before February 2023 may have a different factory password ("meter"). Please contact [support@lumafield.com](mailto:support@lumafield.com) if you have questions about your scanner password.
Start-up procedure
1. **System power:** Connect the system to a grounded 120V outlet
2. **Network connectivity:** Connect the system high-speed Ethernet port
3. **Switch:** Toggle the main power switch (located near the power inlet) to the ON position
4. **Key activation:** Insert the physical Access Key and rotate it to the "Enable" position
5. **Login:** Once the touchscreen turns on, you will be prompted to enter a password to access the scanner dashboard
Initialization steps
There are two steps required periodically before scanning:
1. Motion stage homing (“Begin Homing”)
2. X-ray source warmup (“Begin Warming”)

Motion stage homing
Upon system startup or after a power cycle, you must initialize the motion system. The gantry will move to establish a precise baseline for all subsequent measurements and part positioning.
**Important:** Make sure that all parts and fixtures are removed from the motion stage before homing.
Navigate to the lower-left corner of the touchscreen and select "Begin Homing." Once complete, the screen will display a “Motion stage is homed” message. The redo (circular arrow) icon next to the status message can be selected to recalibrate the machine at any time.
**Important:** If you experience a collision or have engaged the Emergency Stop (E-Stop), a manual re-home is requried to restore system integrity. Again, ensure that all parts and fixtures have been removed from the scanner before rehoming.
X-ray source warmup
Before starting a scan, the X-ray source must warm to reach stable operating conditions. Warmup time can range from under a minute to over an hour, depending on how long the source has been off since the previous scan—longer breaks generally require longer warmup.
Select “Begin Warming” in the bottom left corner of the screen. The scanner will display an estimated warmup time and a progress bar to track status. When warmup is complete, you will see a green checkmark with a “Source is warmed”message.
Automatic warmup (Autowarming)
Automatic warmup or Autowarming is a feature of Lumafield scanners that maintains the X-ray source in a state of operational readiness during idle periods. By scheduling the warmup cycle to complete before the workday begins, you eliminate startup delays and ensure consistent, high quality results from the very first scan of the day.
Depending on local regulatory requirements, **Autowarming** may be available to streamline your workflow. Please contact [support@lumafield.com](mailto:support@lumafield.com) to discuss enabling this feature for your scanner.
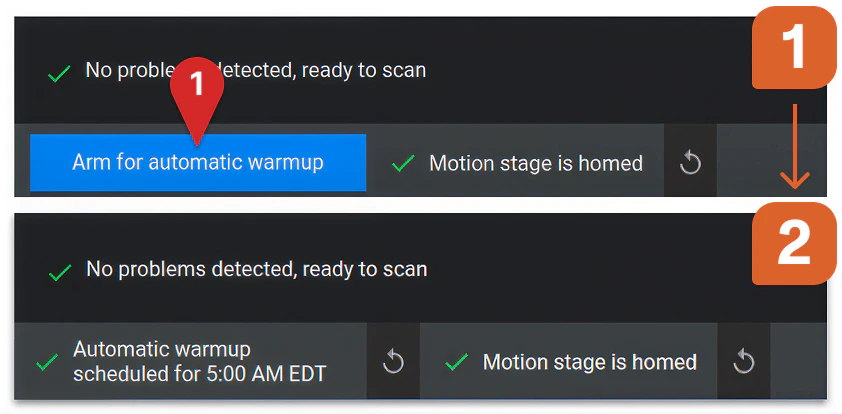 **Important:** To Autowarm your scanner, make sure to select “Arm for automatic warmup” at the end of the day. If you trigger any interlocks (opening the door, E-Stop, turning X-rays on/off, etc.) after selecting the "Arm for automatic warmup," Autowarming will be disarmed.
System power cycle
Occasionally, a full power cycle is required to finalize system updates or resolve transient hardware communication errors. To ensure a successful reset, please follow the steps below:
1. **Clear the chamber:** Ensure all parts and fixtures are removed from the motion stage and the door is securely closed
2. **Power down:** Toggle the main power switch to the OFF position
3. **Discharge:** Wait at least 60 seconds before restoring power. This allows the system’s electronics to discharge completely and fully reset
4. **Restart:** Toggle the main power switch back to ON