What is Auto Scan?
Auto Scan is Lumafield’s primary scanning method. Just put in your part, set the time, and let the system automatically optimize key scan settings to ensure the highest reconstruction quality, streamlining your workflow for routine inspections.Auto Scan vs. Manual Scan
Lumafield recommends Auto Scan for the vast majority of applications. Most users will find that Auto Scan consistently delivers optimal results, with Manual Scan reserved only for highly specialized or non-standard inspection requirements.Note: For non-standard use cases that fall outside the scope of Auto Scan, please reach out to support@lumafield.com for guidance on optimizing your workflow.
Adjustable settings
Auto Scan streamlines configuration so that specialized CT expertise is not required for high-quality imaging. Simply position your part, indicate the material composition, choose the scan duration, and let the Auto Tuner decide the rest of your scan parameters.Position and magnification
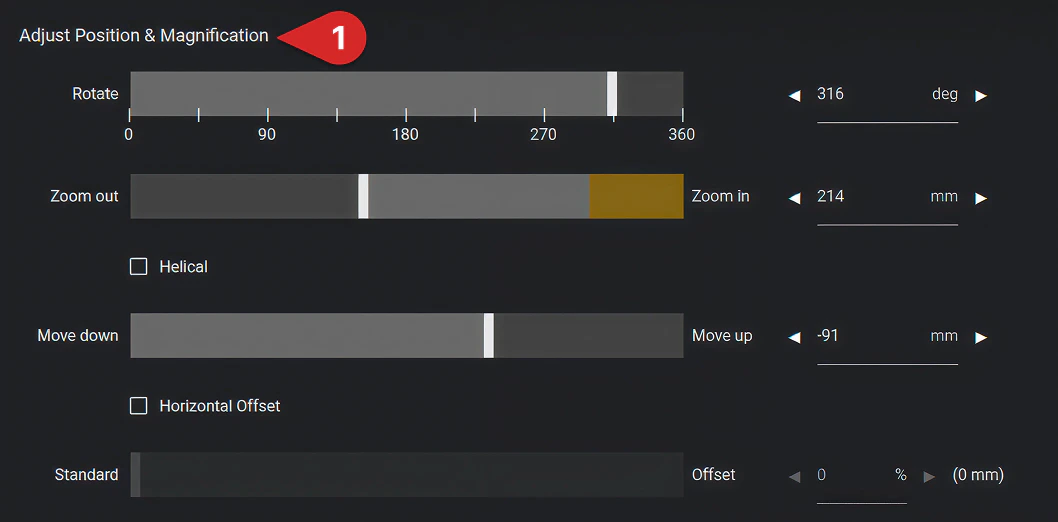
- Rotate: Verify FOV clearance for a full 360° rotation
- Magnify (zoom): Move the part closer to the source to increase resolution
- Translate (up/down): Center the area of interest within the frame
Note: Different Neptune models have specific “sweet spots” for magnification. For detailed resolution benchmarks, refer to the Neptune Positioning Guide. This guide will also provide an overview of the advanced acquisition modules for Helical Scanning and Horizontal Offset Scanning.
Adjust parameters
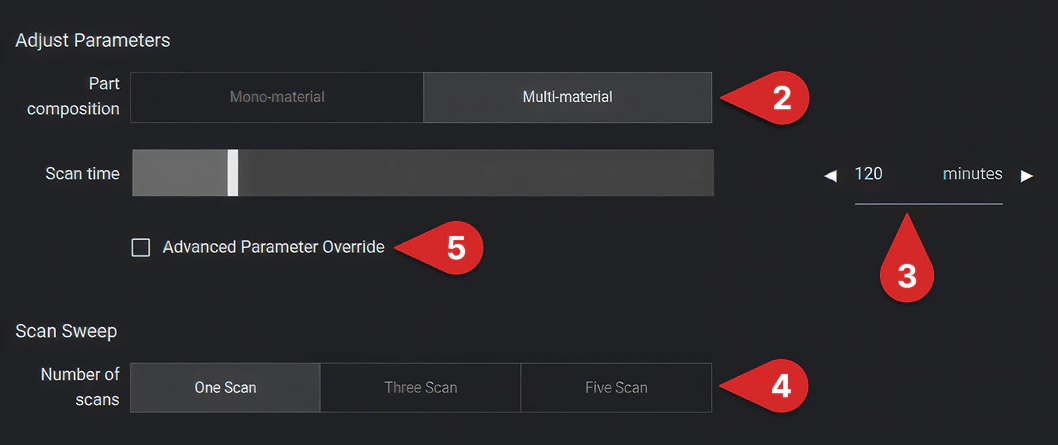
- Mono-material: Select this for parts with a single, uniform density. This setting is also appropriate for assemblies where the material densities are nearly identical, such as a component made from multiple similar plastics
- Multi-material: Optimized for assemblies with a wide range of material densities, this setting helps the software better resolve high-contrast interfaces, such as metal components encased in plastic or complex PCBAs
Scan Sweep
Scan Sweep is a process-optimization tool. It executes a series of back-to-back scans with varying durations within your total allotted Scan Time. Perform a Scan Sweep to compare quality across different scan times.- One scan: Standard single-acquisition mode
- Three or five scans: Best for dialing in the minimum time required to achieve your desired image quality. All scans from the sweep will populate in the same project for ease of comparison across scan times
Advanced Parameter Override
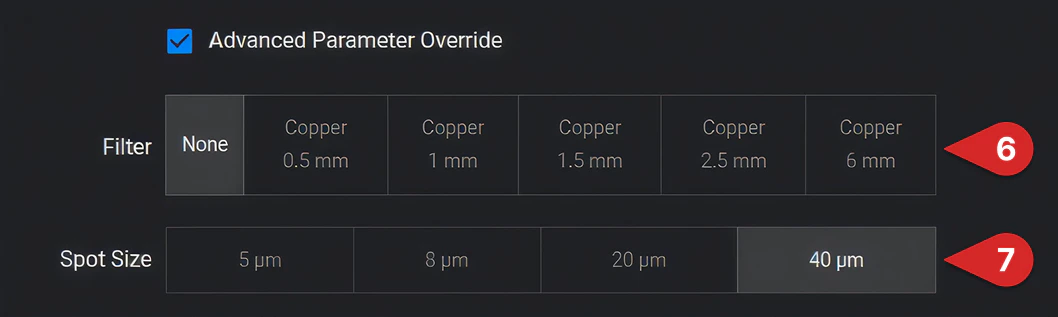
Note: These settings significantly impact scan physics. We recommend using these overrides only if you have a thorough understanding of CT acquisition or have consulted with the Lumafield Support team at support@lumafield.com.
Filter selection
Filters mitigate beam hardening artifacts by removing lower-energy X-rays before they reach the object. This ensures a more uniform beam that is better able to penetrate dense materials.- When to use: Helpful for multi-material assemblies and dense or metallic mono-material parts
- The trade-off: Thicker filters require longer exposure times to maintain adequate signal, resulting in longer scan times
- Available options: Copper filter thicknesses of 0.5 mm, 1 mm, 1.5 mm, 2.5 mm, and 6 mm
Spot size (Neptune MFX only)
Spot size determines the point of origin for the X-ray beam, creating a fundamental trade-off between geometric sharpness and power (flux). Auto Scan typically optimizes spot size to be close to the voxel size of the scan.- Small Spot Size (5 µm): Provides maximum resolution and sharpness; ideal for micro-features but requires longer scan times due to power limitations
- Large Spot Size (40 µm): Allows for higher power and larger overall exposure. Suitable for larger, denser parts where micro-resolution is less critical. Can also be useful in increasing visibility of lower density plastics in a multi-material part
- Available Options: 5 µm, 8 µm, 20 µm, and 40 µm