Below you can find a video walkthrough of using the ROI tools and step-by-step instructions.
For an overview of what an ROI is and when to use it, see the Region of Interest (ROI) reference. You may also find Renormalization and Inspection Planes helpful for common ROI workflows.
Video tutorial overview
1: Initiating the workflow
- Select the data object you would like to author an ROI for (Reconstructions or other ROIs are valid inputs)
- In the toolbar, select the ROI tool to start an ROI workflow.


- Reconstructions or other ROIs can be defined in this dropdown menu.
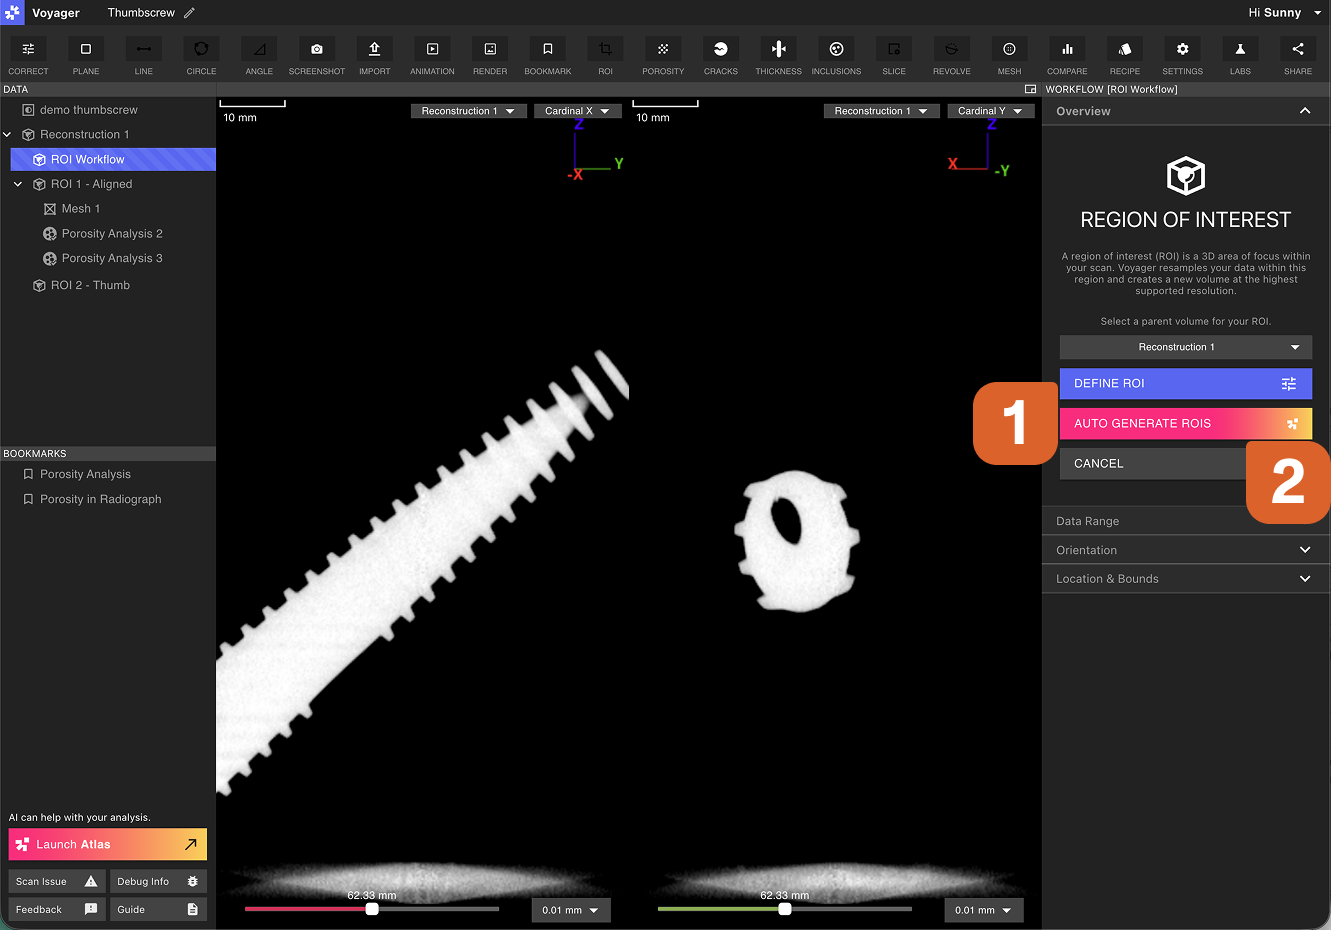
2: Choose Your ROI Method
After selecting your parent volume, you’ll see two options:
Option A: DEFINE ROI (Manual Configuration)
- Click DEFINE ROI to manually configure your ROI
- The Data Range panel will open automatically
- Continue to Step 3: Configure Data Range
Option B: AUTO GENERATE ROIs (Automatic Detection)
- Click AUTO GENERATE ROIs to let Voyager automatically analyze your scan
- The system will identify interesting regions and create multiple ROI options
- A notification will appear at the top: “Submitted auto ROI workflow. A notification will indicate when the new volumes are available.”
- When processing completes, review the generated ROIs in your data tree
- Keep the ROIs that work best for your analysis and delete the rest
 For manual DEFINE ROI workflow only
- The Data Range panel opens automatically after clicking DEFINE ROI
- Adjust the attenuation window to show nearly the full range of your scan
- You can exclude air for clarity, but keep fixtures, tape, and other materials visible at this stage—seeing the complete context helps with alignment
- Configure basic visualization settings:
- Color map (typically Grayscale)
- Opacity
- Clip Lower/Upper toggles if needed

You’ll return to fine-tune Data Range after alignment. For now, prioritize visibility over cleanup.
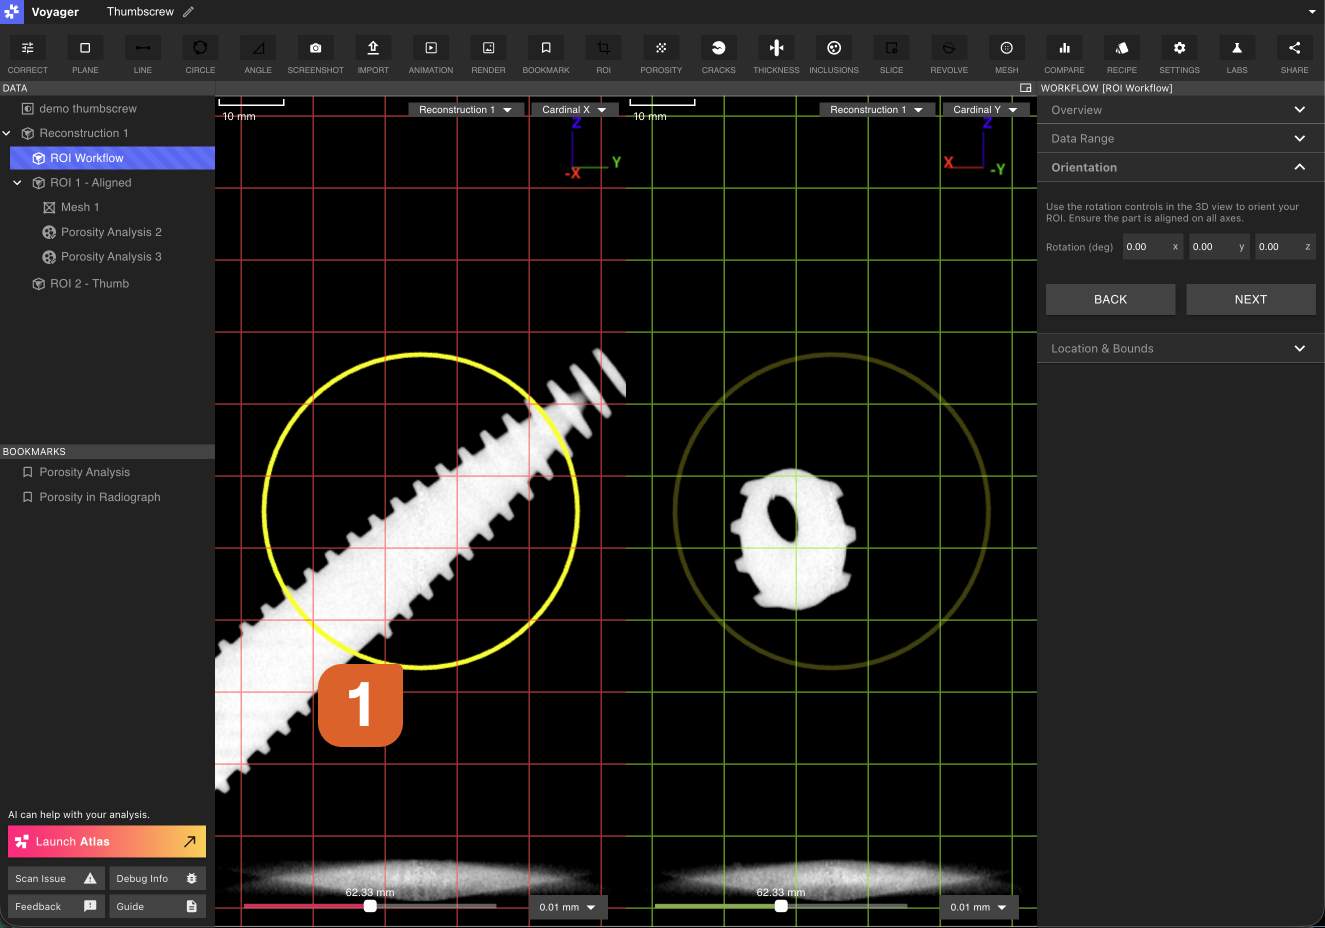
4: Set Orientation (Alignment)
- After configuring initial Data Range settings, expand the Orientation panel
- Use the rotation handles in the 3D viewer to align your part to your preferred coordinate system
- Rotate until measurement axes match your desired reference frame
- This alignment makes downstream measurements and comparisons more repeatable
- A new in-progress data object will be created in your data tree. If you click into other tools, this will stay in the data tab so you can return to your work

You can toggle rotation handles on/off in the viewer to reduce visual clutter once you’ve set your orientation. The viewer defaults to X/Y slice views, and you can cycle through these with the selector.
5: Define Location & Bounds (Cropping)
- Expand the Location & Bounds panel
- Use the cropping handles in the field of view to define tight boundaries around your region of interest
- Focus on isolating the area you want to analyze
- Tighter crop boxes improve software responsiveness and maximize effective resolution

6: Fine-Tune Data Range
- Return to the Data Range panel
- Now that alignment is complete, adjust clipping thresholds to remove unwanted materials:
- Exclude low-density materials (tape, air, foam)
- Exclude high-density materials (fixtures, scanner gantry)
- Configure Renormalization:
- Default range: Uses the full data range of the ROI, with standard clipping
- Selected range: Uses the data range specified by the attenuation graph sliders
- Full data range: Uses the full data range of the ROI, with no clipping

7: Submit the Workflow
- Review your ROI configuration in the viewer
- Click NEXT to submit and create the ROI
- A new ROI volume will be generated and appear in your data tree under the parent reconstruction

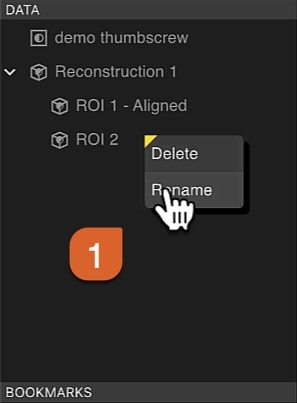
8: Naming and Organization
- ROIs appear as siblings under their parent reconstruction in the data tree
- Right-click on any ROI to rename it for better organization
- Use descriptive names to track multiple ROIs (e.g., “Aligned Threads”, “Cropped Head”, “Internal Features”)

Best Practices
- Work sequentially: Data Range (initial) → Orientation → Location & Bounds → Data Range (fine-tune) → Submit
- Toggle visual elements: Turn off rotation handles after alignment to focus on cropping
- Keep ROIs focused: Tighter boundaries improve performance and resolution
- Use descriptive names: Clear labeling helps when managing multiple ROIs
- Iterate if needed: You can create an ROI from another ROI to progressively refine your focus


